

How to paint your Stove
If your Stove or Woodburner is looking a little worn, marked or rusty, you may be contemplating Re-Spraying or Painting your Stove. What is the best way to do this? Well, it largely depends on your situation and install. Of course, in an ideal world the Stove would be taken outside in the open air, in glorious sunshine. If this is not possible, alternatives can be found, which we will look at in brief. However, for the sake of this Help Topic, we will primarily focus on Re-Spraying and Painting your stove with aerosols.
One thing which is key to remember. Whether you are looking to touch up a mark, or respray the whole appliance, the key to a successful paint job is good preparation, patience and application. This sounds like a cliché, but it is true!
3 Ways to paint your stove.
High Temperature Stove Spray. The preferred option for many, this is the easiest way to re-paint your stove. If applied properly, it also gives the best finish over a large area. See our range of Spray Paints and Colours.
High Temperature Brush on Paint. Perfect for touching up odd marks or imperfections. It is also ideal for tight spaces and where the stove is in situ and spray would be impractical. Generally limited to black. See here.
Stove & Grate Polish. As its name suggest, it works similarly to boot polish. Will give a nice polished finish, but not a substitute for a respray. Click here for stove and grate polish.
From here on in, we will be focusing on painting your stove with aerosols.
Preparation for painting your stove.
It is worth repeating that preparation is key. Spending a little bit longer ensuring adequate preparation will give you a far better chance of that perfect finish. As we have already said, in an ideal situation the stove would be outside on a sunny day (20 – 25 deg is best). Not only are these ideal conditions for painting your stove, but it also ensures a ventilated area for yourself. It goes without saying that the stove needs to be cool and you should wear suitable safety equipment. Gloves, Mask and Eye protection. Further, ensure there is no naked flame or pilot light in the vicinity.
Next you need to prepare the area for respraying. You might like to consider giving the inside of the woodburner a deep clean first. Ash blowing around on your new coat of paint can be infuriating. Remove any loose paint, dust, rust and grease – surfaces may require sanding if particularly bad. Do not use petroleum based cleaners or thinners as this will cause paint failure.
Think about your surroundings. If you are not able to take the appliance outside, then cover anything which might get caught in the spray mist. This also applies to stove glass, door handles etc which you can either remove or cover.
Make one final check of the stove ensuring there is free from all dirt and dust on the surface.
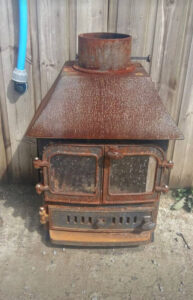
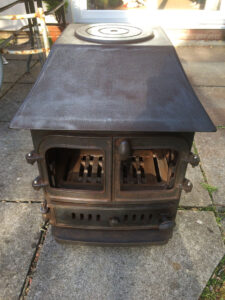
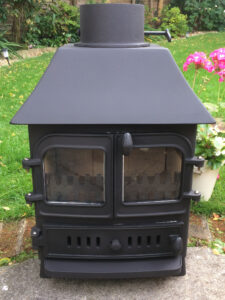
Pictures showing transformation of rusty stove, after preparation and post spray.
Respraying your stove.
Once you are happy with your preparation, you are ready to start spraying. Make sure you the can/contents are up to room temperature. Shake vigorously for at least 2 minutes before use and perform a test spray on paper/card. For best results hold the can at least 12″ away from the surface. Start by applying a thinly misted layer. Then let it dry and add another misted layer. Repeat as necessary. By building the paint up in multiple thin layers, you will get a far superior finish than one or two thick coats. Thick coats are more likely to peel and generally look inferior. This takes patience, but it is well worth it.
The best temperature for both spray and stove is (20 – 25deg). Do not spray near naked flames for your own safety.
Do not move the stove until you are sure it is dry. The last thing you want to do is ruin that perfect paint job with sticky fingerprints.
How quickly can I use my stove after respraying? Curing Process.
During the painting process and for the first few times you subsequently use your appliance the paint will give off fumes. Ensure good ventilation and a fresh airflow to disperse.
The following instructions are taken from Stove Bright spray paint. Use kindling only on the first two fires, which should burn for 15-20 minutes with the second burn being burnt whilst the appliance is still warm. A full fire should be burnt for 45-60 minute; again starting while the stove is still warm, then allowed to cool naturally. Your paint should now have cured.
Safety.
Used incorrectly, stove spray can be dangerous and harmful to your health. It is vital that you follow the instructions on the product carefully and wear appropriate safety gear. The above advice is to be used as a guide only and does not cover every eventuality or situation. Individual product instructions supersedes any advice above. If in any doubt, or you are unsure what to do, seek the services of a suitably qualified engineer.
Stove bright offer a number of different colours and variations. See the full range here.
We also offer specific manufacturers paint. These are located within the specific manufacturers pages on our website. We’ve created shortcuts here to help…
Aarrow, Charnwood, Morso, Nordpeis,
If you found this guide helpful, why not check out our other help topics.


")


